Excel Local File
The CSV Local File input will upload a file in xlsx and xls formats.
To use this input method, the user must select a file from their local file system by clicking the “upload” button and using the pop-up file browser. The selected file will then be present and auto-selected in the “select or upload file” list shown below. At this point, most use cases will not require any further setting configuration, but if this task is run and subsequently stop with an error, then the user should click the check box next to “Use Safe Mode”. This should resolve most errors, but if the error persists or another error appears, then further troubleshooting will be required.
Settings
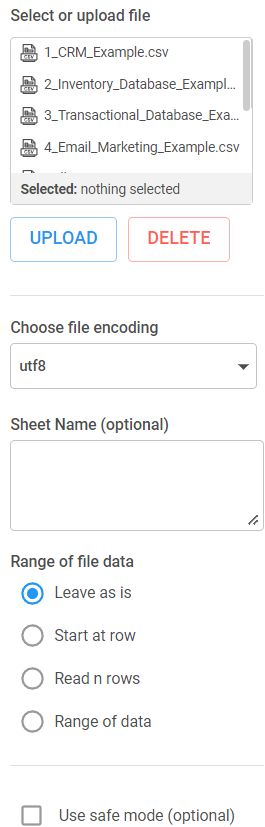
Select or upload file: First, click the blue UPLOAD button to find a file on your device to upload into Inzata. Click on the file you would like to load with this input selector. If there are files in the box you would like to delete, click on it to highlight it and click the red DELETE button.
File selected: When you select a file in the previous box, it will be displayed here so you can confirm it is the correct file.
Choose file encoding: If you know the encoding of your csv file, you can select it here. The default and most common is UTF-8.
Sheet name (optional): Leave blank to load in the first sheet of the excel file. To load in a sheet that is not the first, type the name in this box.
Range of file data: Select one of the four options. By default, it will select ‘Leave as is’.
- Leave as is: This will read in the entire sheet
- Start at row: Selecting this will show a box at the bottom of the list. Type in the row number you would like to start at. If you have blank columns or extra metadata at the top of your excel sheet, this will allow you to skip those rows and load in only the rows containing the data you need for analysis.
- Read n rows: Selecting this will show a box at the bottom of the list. Type in the number of rows you would like read in. This will start at the first row and only read in the number of rows you specify.
- Range of data: Selecting this will show two new boxes at the bottom of the list. The first asks you to specify the Top left cell and the second asks to specify the Bottom right cell. This will read in every cell between the two specified cells.
Use safe mode (optional): Check this box if you would like to upload with safe mode.

