How to create segments in Inzata

1. Create a grid
The first step is to create a new grid. To choose a name for it, click on “grid” at the top of the right-side menu bar and enter the desired name into the “Name” field on the “grid” panel. Populate the grid with the metric to be used for segmentation followed by the relevant attributes by dragging and dropping the metrics and attributes onto the grid or pivot table.
Start with metrics (I recommend bringing in the # PRIMARY KEY OF TABLE first as done in the above example) that you are going to be analyzing. You may run into a Row Limit reached warning. If that occurs, you can apply the suggested Filter and continue working.
Once your metrics are pulled in, bring in your attributes (NOTE: the metrics will be unfiltered aggregates until you pull in attributes so don’t try to validate numbers at that step). Depending on what entity you are segmenting, you should include an attribute that is unique for each record of that entity. Here, that attribute with the unique records for each entity is “pk”.
Now that your grid is made, you can add one or more filters to narrow the selection of data that will be segmented. At this point, save the grid before moving on.
2. Create the Flow
If there is no flow template already made, create a new flow. See the documentation on how to create a new flow. You will use the Inzata Report input method and select the grid that was made in step 1 using the dropdown menu.
It is recommended to use the “Info” button on the right to rename the report to the segment name (ie. “Segment A”).
From here, you’ll want to add transformations necessary for the analysis. Some suggested transformations are renaming columns to remove spaces and make the names friendlier for the next steps and using the Prefix/Suffix Column task to add a prefix to all the column names in a load.
Read about the different types of transformations on the documentation page to determine which ones you will need. Some ones you should have:
Rename Column: When attributes are used in Inzata grids, Inzata appends “ (Text)” or a similar tag to the attribute name. The rename column task in inflow can be used to fix the name so that the tag is no longer present, and the name is clearer.
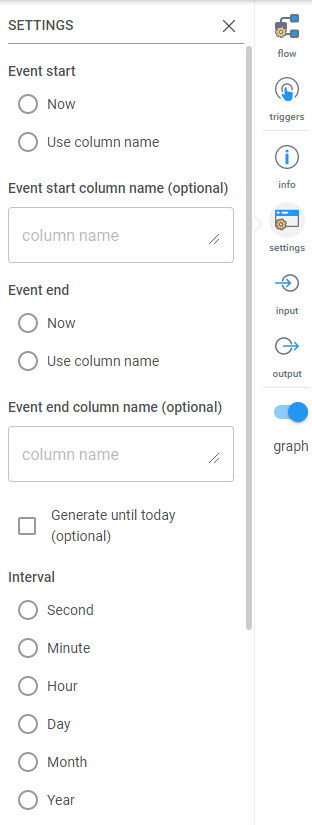
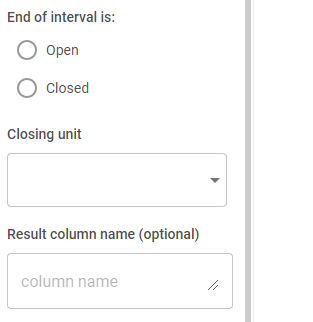
SQL Like Case Statement: You’ll need this to create your segments. This task functions very similar to how SQL works within a CASE statement, but there is documentation that specifically addresses how to use this SQL Like Case statement task on the Inzata support site for more details. You can have ANDs in your WHEN statement if multiple conditions need to be met. At the ELSE part of the case statement, you may want to enter “Unclassified” or “Unsorted” to make later troubleshooting easier when testing the results of the segmentation. For an example of a SQL Like Case statement being used to create segmentations, see below. That newly created column “segmentation” contains two different values to represent two different segments, “After Y2K” and “Before Y2K”.
Don’t forget to add a prefix to the column names (ie. segment_tab_) and name your segment in the blue Inzata load box (ie. segment_on_date). The final draft of your segmentation flow should look like this:
The inputted data from the grid was converted using this flow to two columns of data that look like this:
Now that the segments are created, you can join the segmentation data to your data model on the “pk” field with inModeler.

